What goes into a network namespace? What’s a CNI plugin? This blog post explores the contents of a network namespace and then provides links to the open source code that creates and configures namespaces for containarized workloads running on Fargate and ECS Managed Instances.
Background and Motivation
When you launch a task in ECS Managed Instances you can pick two network modes, awsvpc and host. In this series of post I want to explain the role in the CNI plugins have in creating and setting up network namespaces for customer tasks. In awsvpc each task receives its own elastic network interface (ENI) and private IPv4 address. Under the hood the code that creates and manages network namespaces (netns) for Fargate also handles Managed Instances. The plugins that handles this setup are open source but they are somewhat hidden behind the netlib platform API (as they should) so the typical dataplane engineer does not see the plugin code on day-to-day therefore i’s’ kind of a black box to most folks in my team, but it doesn’t have to be.
What are network namespaces for?
A Linux namespace is a construct that creates an isolated copy of the networking stack. Namespaces allows multiple ECS tasks to run on the same host with different IP addresses, DNS configurations, and route tables.
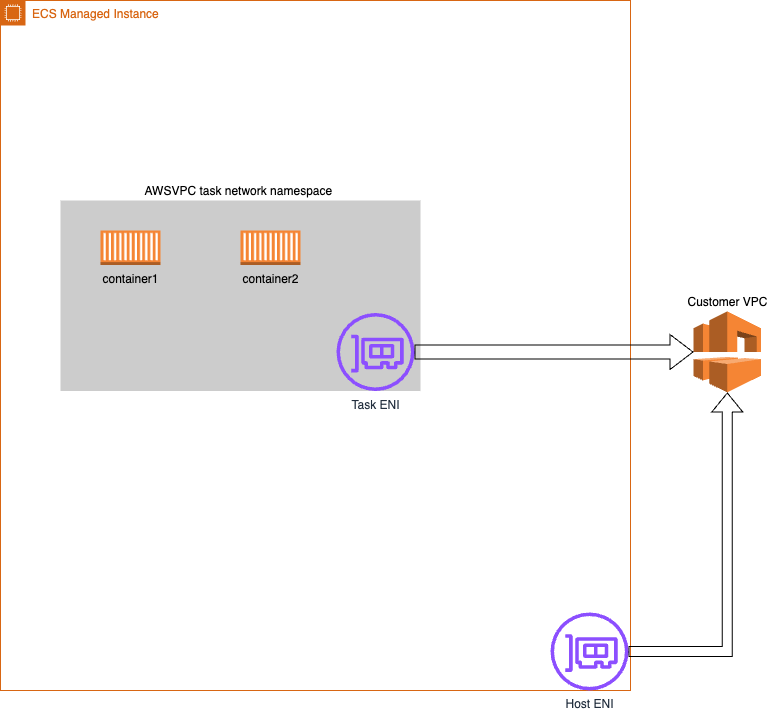
In ECS, when you want to run containerized applications, you create a task that can contain up to 10 containers. All containers within a task share the same network namespace. Each managed instance supports multiple network interfaces (ENIs) attached, task ENIS are provisioned by ECS Control plane at task launch time.
Let’s take a look under the hood.
Setting Up the Investigation
I will launch an EC2 instance using an AMI provisioned with the ECS Managed Instance Agent running on Bottlerocket. This agent runs the same dataplane software that powers production instances. To enable debugging access, I’ll create a variant that includes the login and SSM packages, allowing me to connect via the EC2 Serial Console. The instance will launch in EC2 debug mode, which means it won’t be managed by the ECS Control Plane but will be fully owned by my account.
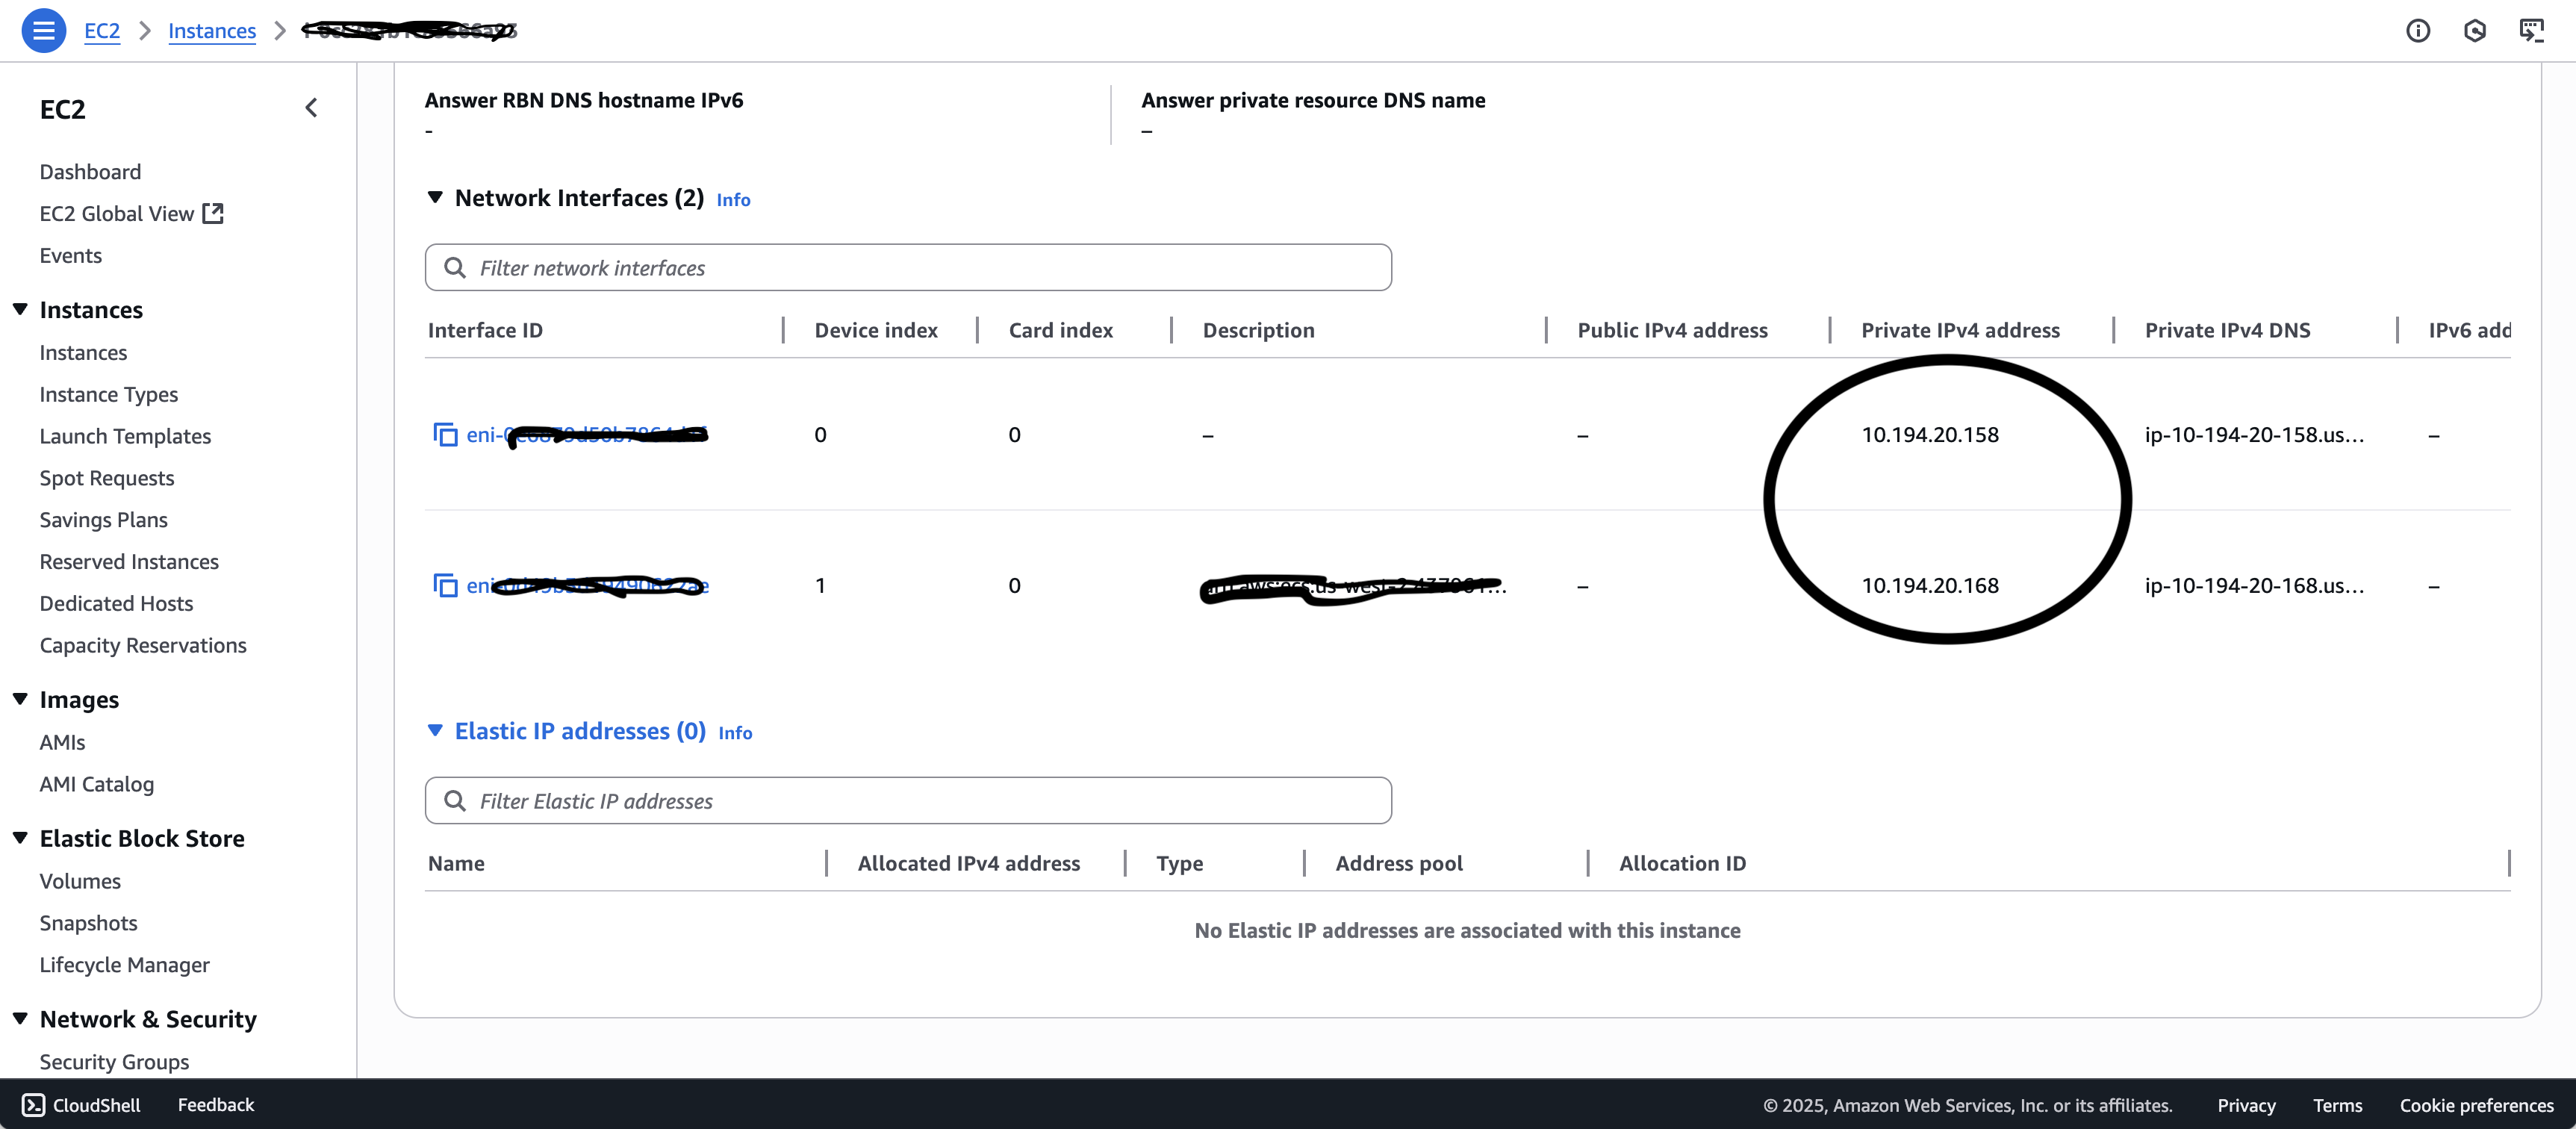
The AWS Console shows that I have an EC2 instance with two ENIs attached. I have two private IPs associated with each ENI. 10.194.20.168 is my task IP and 10.184.20.158 is the IP address of my host. The primary ENI is listed as Index 0 and the task ENI is listed as Index 1.
Examining Network Interfaces from the Host
Connecting to the instance as the root user and running ip link show produces the following output:
ip link show
1: lo: <LOOPBACK,UP,LOWER_UP> mtu 65536 qdisc noqueue state UNKNOWN mode DEFAULT group default qlen 1000
    link/loopback 00:00:00:00:00:00 brd 00:00:00:00:00:00
2: eth0: <BROADCAST,MULTICAST,UP,LOWER_UP> mtu 9001 qdisc mq state UP mode DEFAULT group default qlen 1000
    link/ether 02:df:6a:de:12:21 brd ff:ff:ff:ff:ff:ff
    altname enp0s5
    altname ens5
4: fargate-bridge: <BROADCAST,MULTICAST,UP,LOWER_UP> mtu 1500 qdisc noqueue state UP mode DEFAULT group default qlen 1000
    link/ether 2a:56:f8:7a:ea:8e brd ff:ff:ff:ff:ff:ff
5: veth752433c6@if3: <BROADCAST,MULTICAST,UP,LOWER_UP> mtu 1500 qdisc noqueue master fargate-bridge state UP mode DEFAULT group default
    link/ether a2:03:66:23:29:82 brd ff:ff:ff:ff:ff:ff link-netns a333f40b6ac74e92b1541fb0a5d76f9e-02ed2d974f29
The ip link show command gives you the list of network interfaces in a Linux system. Notice that it only shows one ENI “eth0” but you don’t see the task ENI “eth1”.
Let’s confirm that eth0 is my actual primary ENI by comparing its address with the info from my AWS Console:
bash-5.2# ip address show
1: ...
2: eth0: <BROADCAST,MULTICAST,UP,LOWER_UP> mtu 9001 qdisc mq state UP group default qlen 1000
    link/ether 02:df:6a:de:12:21 brd ff:ff:ff:ff:ff:ff
    altname enp0s5
    altname ens5
    inet 10.194.20.158/24 metric 1024 brd 10.194.20.255 scope global eth0
       valid_lft forever preferred_lft forever
    inet6 fe80::df:6aff:fede:1221/64 scope link proto kernel_ll
       valid_lft forever preferred_lft forever
       ...
Yep, I see that the IP for eth0 is 10.194.20.158/24 and I see the MAC address matches. I also noticed that eth1 is not visible from the primary network namespace—as far as the host is concerned there is only one gateway to the internet.
Exploring Network Namespaces
Let’s get a list of the network namespaces running:
bash-5.2# ip netns show
a333f40b6ac74e92b1541fb0a5d76f9e-02ed2d974f29 (id: 0)
bash-5.2# ctr -n fargate.task t ls
TASK                                           PID     STATUS
a333f40b6ac74e92b1541fb0a5d76f9e-0883211837    1551    RUNNING
bash-5.2#
The first command ip netns show gives me a list of all the network namespaces. The second command is ctr, a command line client to talk to the containerd daemon. t ls lists all the tasks running in the fargate.task namespace.
Yes, we’re running the Fargate Agent under the hood :)
Let’s see what the namespace looks like from inside the network namespace (netns) of my awsvpc task. I’ll use a nifty tool called ip netns exec, which allows me to launch commands inside a network namespace.
# ip netns exec a333f40b6ac74e92b1541fb0a5d76f9e-02ed2d974f29 ip link show
1: lo: <LOOPBACK,UP,LOWER_UP> mtu 65536 qdisc noqueue state UNKNOWN mode DEFAULT group default qlen 1000
    link/loopback 00:00:00:00:00:00 brd 00:00:00:00:00:00
3: eth0@if5: <BROADCAST,MULTICAST,UP,LOWER_UP> mtu 1500 qdisc noqueue state UP mode DEFAULT group default
    link/ether 0a:58:a9:fe:ac:02 brd ff:ff:ff:ff:ff:ff link-netnsid 0
4: eth1: <BROADCAST,MULTICAST,UP,LOWER_UP> mtu 9001 qdisc mq state UP mode DEFAULT group default qlen 1000
    link/ether 02:ed:2d:97:4f:29 brd ff:ff:ff:ff:ff:ff
    altname enp0s6
    altname ens6
Well, there it is. eth1 is here! Notice that eth0 is not here. As far as the container namespace is concerned, there’s only one ENI in this host.
Let’s confirm by looking at the IP address assigned to eth1:
# ip netns exec a333f40b6ac74e92b1541fb0a5d76f9e-02ed2d974f29 ip address show
1:...
3:...
4: eth1: <BROADCAST,MULTICAST,UP,LOWER_UP> mtu 9001 qdisc mq state UP group default qlen 1000
    link/ether 02:ed:2d:97:4f:29 brd ff:ff:ff:ff:ff:ff
    altname enp0s6
    altname ens6
    inet 10.194.20.168/24 scope global eth1
       valid_lft forever preferred_lft forever
    inet6 fe80::ed:2dff:fe97:4f29/64 scope link proto kernel_ll
       valid_lft forever preferred_lft forever
Yes, eth1 has 10.194.20.168 which matches what the AWS console tells me.
The Complete Network Picture
Okay, but what about the other stuff I see in the IP command output?
Yes, good question. This is not obvious, but there’s one more thing: there’s a bridge from the task namespace that connects it to the task metadata service (TMDS). The namespace is connected via a veth pair. The full namespace picture looks like this:
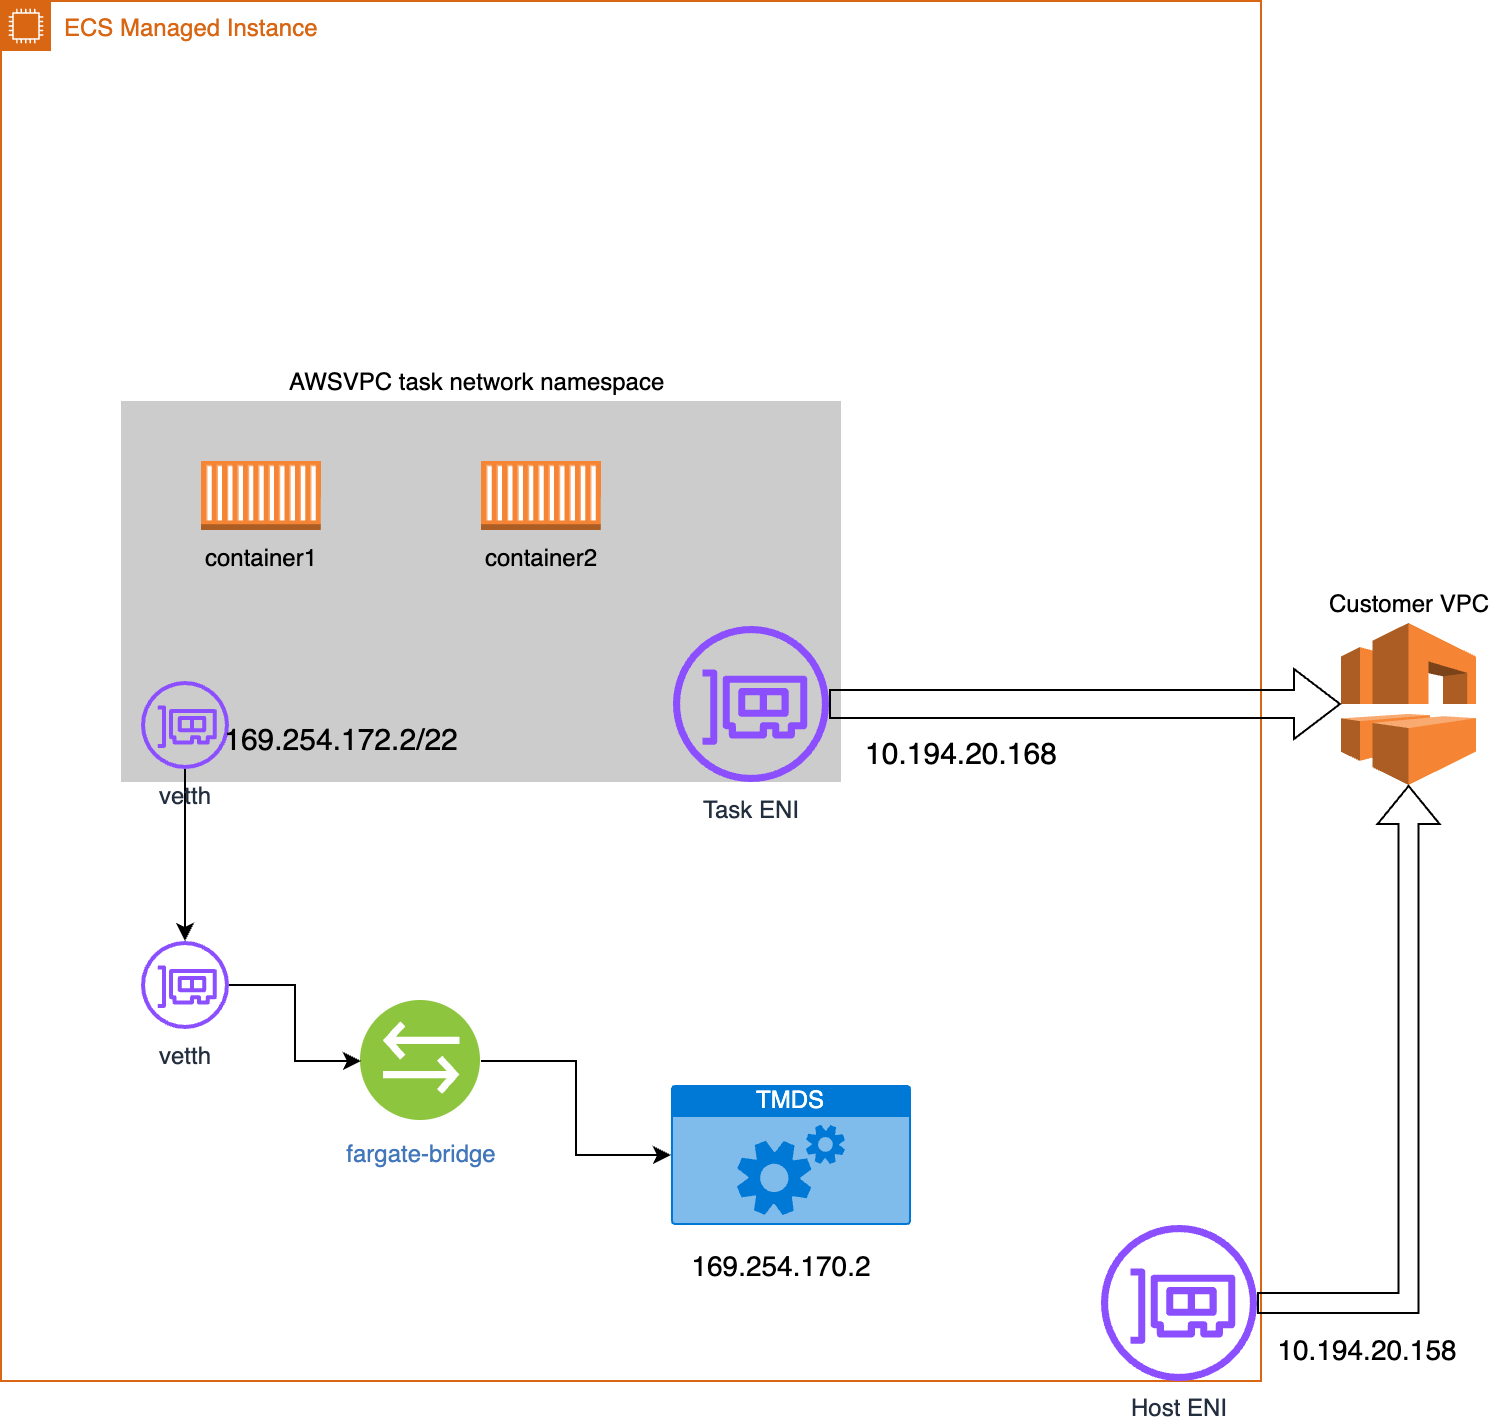
Now we see that eth0@if5 is a veth (virtual ethernet) device connected to another veth in the primary interface that will route MAC frames to the fargate-bridge which acts as a virtual switch and will route MAC traffic to the task metadata server (TMDS) running on my primary namespace.
What else goes into a netns?
Besides the network interface we need to configure the namespace with everything it needs to work as an effectual copy of a Linux network stack, with its own routes, firewall rules and devices. In awsvpc tasks this means you get:
- A loopback interface
- DNS configuration files
- Routes in the iptables
- A veth interface that connects to the primary netns
How to configure network namespaces using IP commands
One way to configure network namespaces is to use the IP command to create and configure the network namespace.
To configure a namespace like awsvpc, you need to create the netns and configure the ENI, you need to configure DNS and create a bridge from the netns to the task metadata server.
To create a netns use ip netns add command:
sudo ip netns add my_container_ns
This command creates a new, empty network namespace named my_container_ns. It will appear as a mount point under /var/run/netns. [1]
If you want to configure an ENI you’d use ip link commands to create, setup, add IP address, set MTU, etc. For illustrative purposes I’ve added some scripts created with generative AI.
This looks about right (use at your own risk, this is untested code).
To create a namespace with a bridge run something like this:
#!/bin/bash
# This script creates a network namespace, a veth pair, and a bridge between
# the host and the network namespace.

set -e

# --- Configuration ---
NS_NAME="testns"         # Name of the network namespace
VETH_HOST="veth-host"    # veth interface in the root namespace
VETH_NS="veth-ns"        # veth interface inside the namespace
BR_NAME="br0"            # Name of the bridge
IP_HOST="10.200.1.1/24"  # IP for host side of the bridge
IP_NS="10.200.1.2/24"    # IP for namespace side

# --- Cleanup any previous setup ---
cleanup() {
    echo "Cleaning up any previous setup..."
    ip netns del "$NS_NAME" 2>/dev/null || true
    ip link del "$VETH_HOST" 2>/dev/null || true
    ip link del "$BR_NAME" 2>/dev/null || true
}
cleanup

# --- Create namespace ---
echo "Creating network namespace: $NS_NAME"
ip netns add "$NS_NAME"

# --- Create veth pair ---
echo "Creating veth pair: $VETH_HOST <-> $VETH_NS"
ip link add "$VETH_HOST" type veth peer name "$VETH_NS"

# --- Move one end into the namespace ---
ip link set "$VETH_NS" netns "$NS_NAME"

# --- Create and configure bridge ---
echo "Creating bridge: $BR_NAME"
ip link add name "$BR_NAME" type bridge
ip addr add "$IP_HOST" dev "$BR_NAME"
ip link set "$BR_NAME" up

# --- Attach host veth to the bridge ---
ip link set "$VETH_HOST" master "$BR_NAME"
ip link set "$VETH_HOST" up

# --- Configure namespace side ---
ip netns exec "$NS_NAME" ip addr add "$IP_NS" dev "$VETH_NS"
ip netns exec "$NS_NAME" ip link set "$VETH_NS" up
ip netns exec "$NS_NAME" ip link set lo up
ip netns exec "$NS_NAME" ip route add default via "${IP_HOST%/*}"

# --- Enable IP forwarding (optional) ---
echo "Enabling IP forwarding..."
sysctl -w net.ipv4.ip_forward=1 >/dev/null

echo
echo "✅ Setup complete!"
echo "Namespace: $NS_NAME"
echo "Bridge:    $BR_NAME ($IP_HOST)"
echo "veth pair: $VETH_HOST <-> $VETH_NS"
echo
echo "To test connectivity:"
echo "  ip netns exec $NS_NAME ping -c 3 ${IP_HOST%/*}"
echo "To enter the namespace shell:"
echo "  ip netns exec $NS_NAME bash"
To setup an ENI do something like this:
#!/bin/bash
# Configure an AWS Elastic Network Interface (ENI)
# using 'ip link set', 'ip address add', and 'ip link set up'.

set -euo pipefail

# --- User configuration ---
# Change these to match your setup
ENI_IFACE="eth1"           # The interface name of the ENI (check with `ip link`)
ENI_IP="10.0.2.50/24"      # Private IP address for the ENI
ENI_GW="10.0.2.1"          # Default gateway (in ENI's subnet)
ROUTE_TABLE="main"         # Optional: routing table to use

# --- Validate interface existence ---
if ! ip link show "$ENI_IFACE" &>/dev/null; then
    echo "❌ Error: Interface $ENI_IFACE not found. Check 'ip link' output."
    exit 1
fi

echo "🔧 Configuring ENI interface: $ENI_IFACE"

# --- Bring interface down before configuring (optional safety) ---
ip link set "$ENI_IFACE" down

# --- Assign IP address ---
echo "➡️  Assigning IP address: $ENI_IP"
ip address flush dev "$ENI_IFACE"
ip address add "$ENI_IP" dev "$ENI_IFACE"

# --- Bring interface up ---
echo "⬆️  Bringing interface up..."
ip link set "$ENI_IFACE" up

# --- Add default route (optional) ---
echo "🛣️  Setting default route via $ENI_GW"
ip route replace default via "$ENI_GW" dev "$ENI_IFACE" table "$ROUTE_TABLE"
ip rule add from "${ENI_IP%/*}" lookup "$ROUTE_TABLE" || true

echo
echo "✅ ENI configuration complete!"
echo "Interface: $ENI_IFACE"
echo "IP:        $ENI_IP"
echo "Gateway:   $ENI_GW"
echo
echo "To verify:"
echo "  ip addr show dev $ENI_IFACE"
echo "  ip route show table $ROUTE_TABLE"
CNI Plugins
Luckily, we don’t have to use IP tools (I believe we used to before CNI plugins) since containerD relies on external plugins for network configuration. Unlike Docker users, containerD users have the freedom to customize the networking environment.
The CNI plugins and the netlib package in the ecs-agent shared library encapsulate the complexity of setting up network namespaces. The caller makes two method calls: one to build the namespace configuration and one to “Start” the namespace. The high level sequence of events from Start goes something like this:
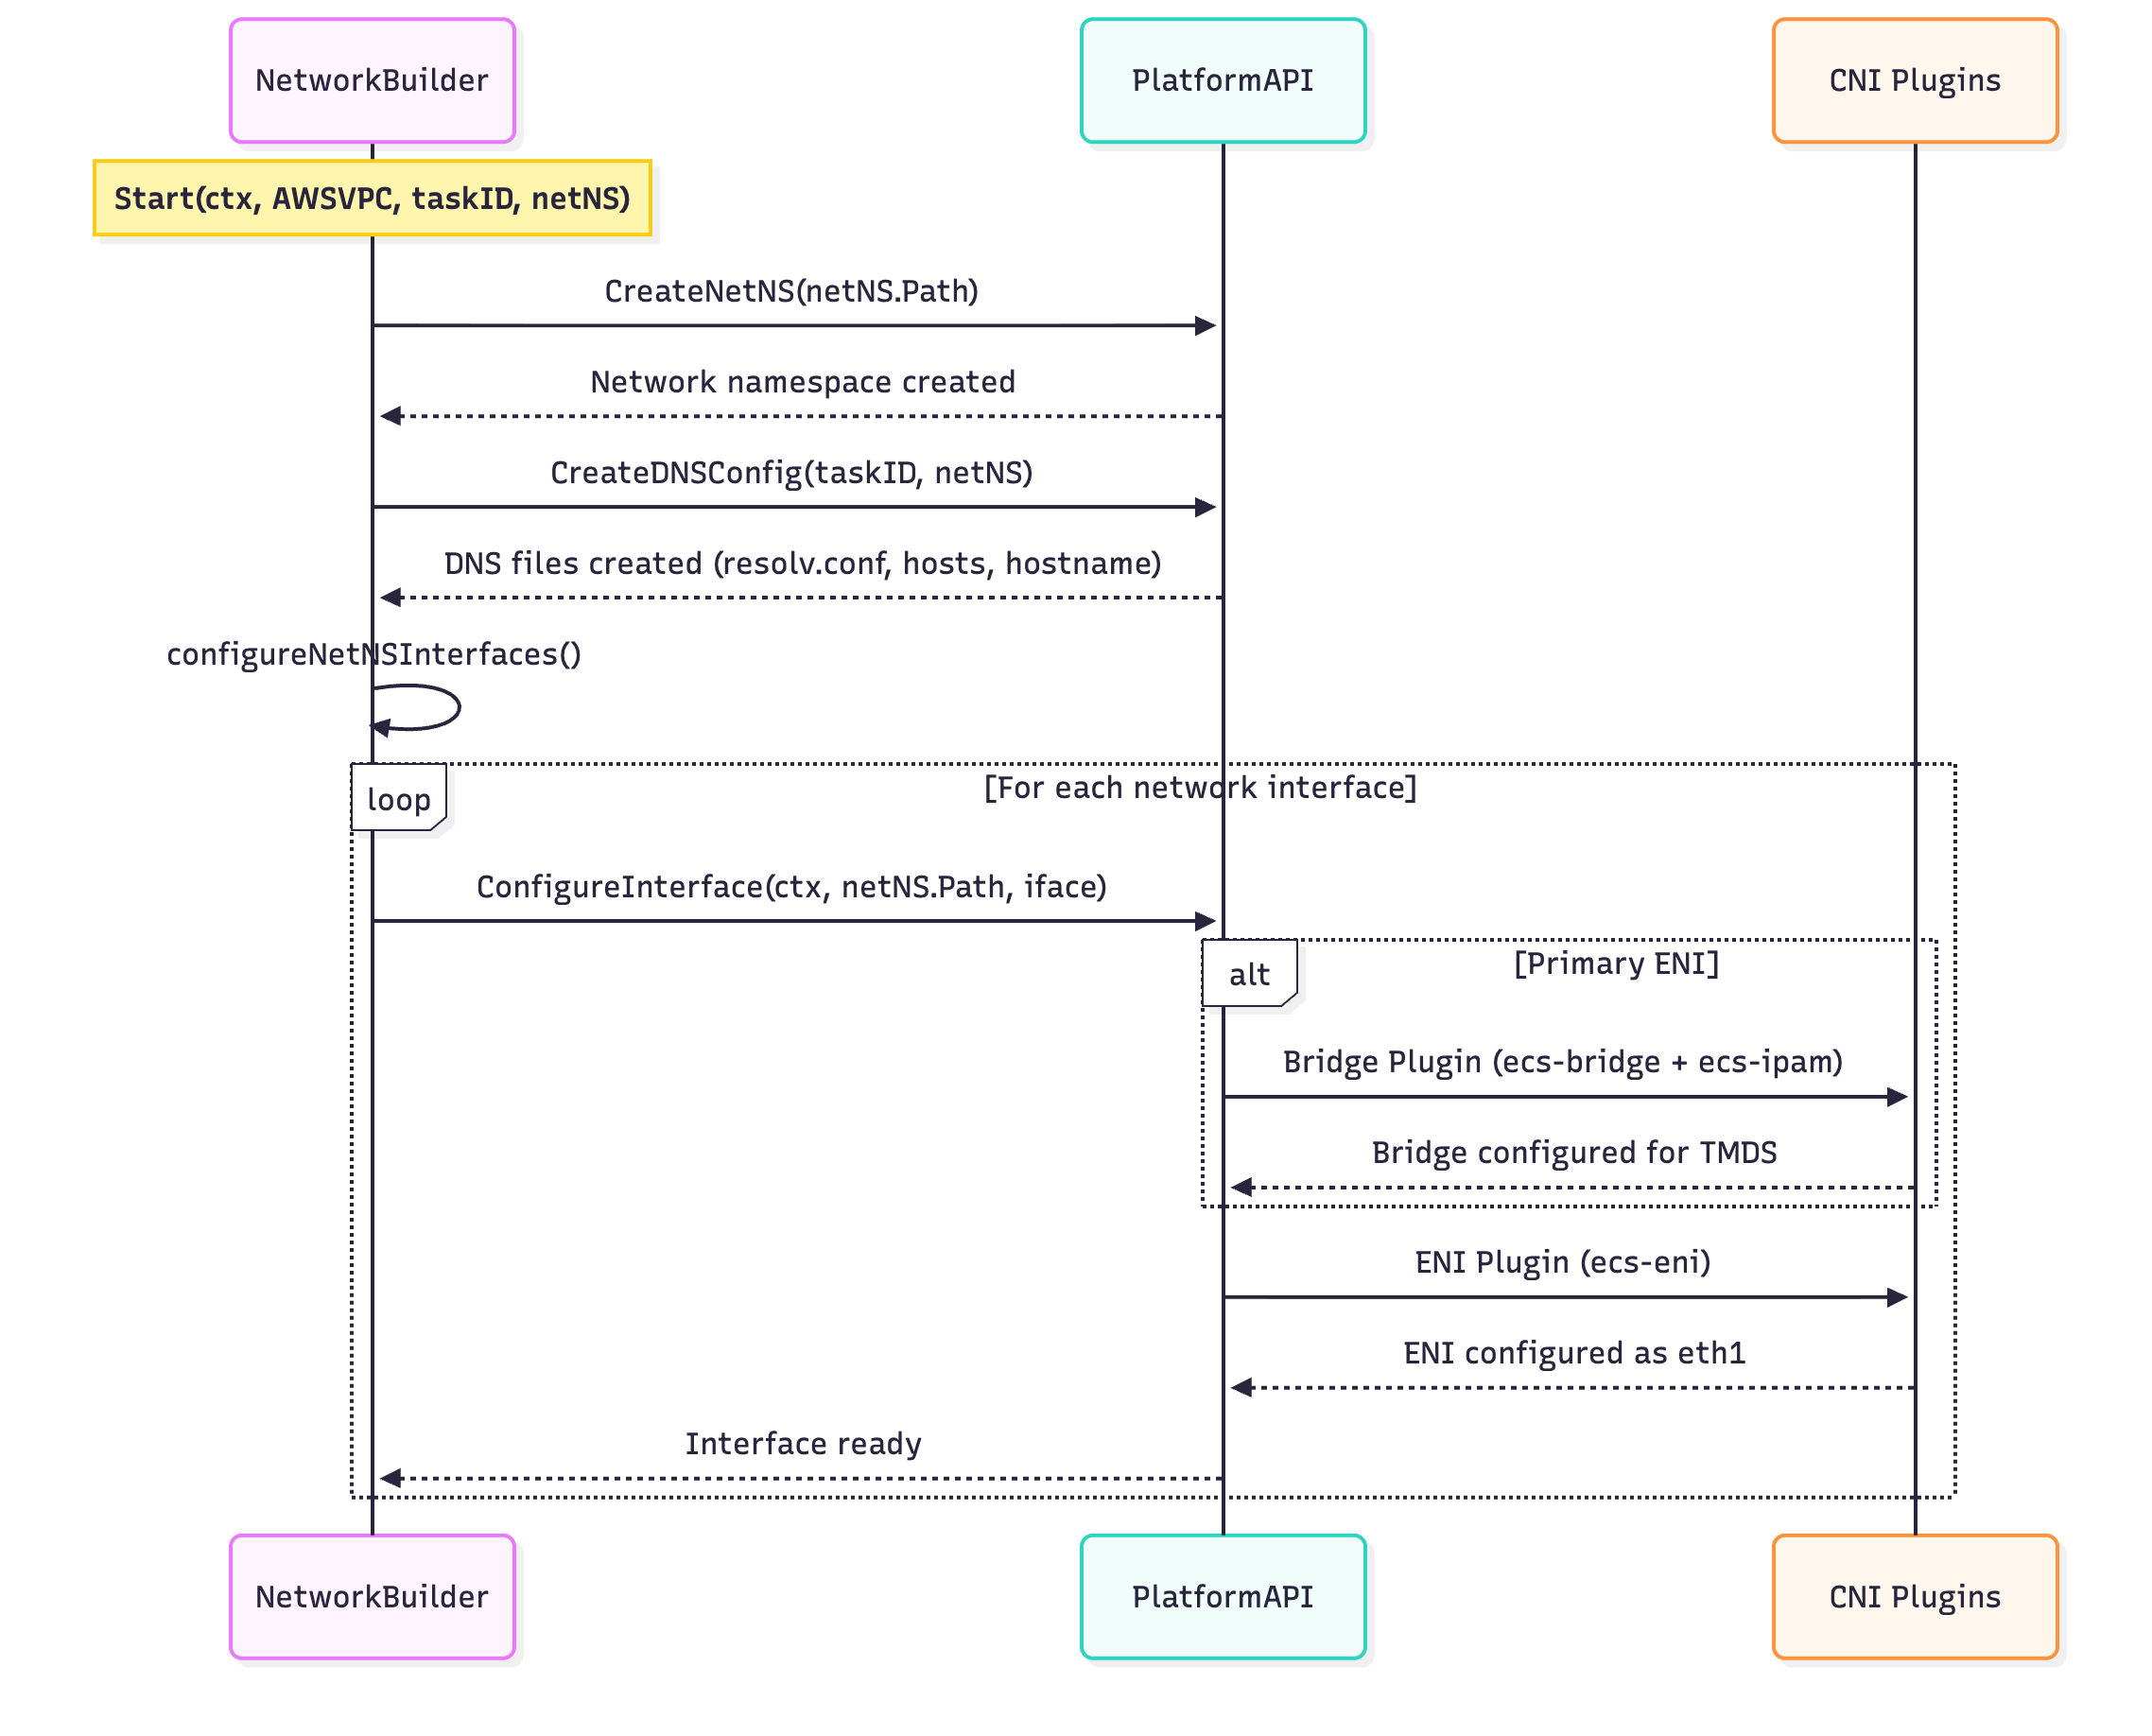
- Create Namespace
- Configure DNS
- Configure ENI
- Create Bridge
- Get IP from IPAM
- Setup routes with iptable entries
- Configure Network Interface
- Move to netns
- Assign IPs
- Configure iptables and routes
- Create Bridge
The plugins mainly wrap IP commands from the netlink library. This Go library simplifies adding and removing interfaces. Netlink is the successor of ioctl, a set of system calls historically (although still supported in some distros) used to configure serial devices. Since network interfaces are usually ethernet (at least in EC2 instances) this is the way to programmatically setup the system. Our customers shouldn’t have to care/worry since this is all done for them by the ECS dataplane.
So which CNIs do we use?
For setting up awsvpc namespaces without any special networking features (such as Service Connect, AppMesh, Multi-ENI) we use the following:
ENI and Branch-ENI
ECS Managed Instances and Fargate use two types of ENIs: x-ENIs (Regular ENIs in the code) and branch ENIs (ENIs that leverage trunking). They are in the ENI and branch-eni packages respectively. Under the hood the plugins call netlib to setup the links.
The ECS ENI plugin configures a container’s network namespace to use an Elastic Network Interface (ENI) directly. It moves an ENI from the host into the container’s network namespace.
Key Components
Engine Interface
The core logic is in the engine package, which handles:
- Retrieving ENI metadata from EC2 instance metadata service
- Finding the network device by MAC address
- Setting up the container namespace with the ENI
Main Flow
Plugin Entry: The main function uses CNI’s
skel.PluginMain()to handle ADD/DEL commandsADD Command Process:
- Parses configuration (ENI ID, MAC address, IP addresses)
- Uses EC2 metadata service to find the ENI’s network device name
- Calls
SetupContainerNamespace()to move the ENI into the container
Key Engine Operations:
GetInterfaceDeviceName(): Finds the host device name using the MAC addressGetIPV4GatewayNetmask(): Retrieves gateway/netmask from EC2 metadataGetIPV6Gateway(): Gets IPv6 gateway from routing tableSetupContainerNamespace(): Moves the ENI into container’s network namespace
Configuration Parameters
The plugin accepts:
eni: ENI ID (required)mac: MAC address (required)ipv4-address: Primary IPv4 address (required)ipv6-address: IPv6 address (optional)block-instance-metadata: Block metadata access (optional)stay-down: Keep interface down (optional)
How It Works
- The plugin receives an ENI that’s already attached to the EC2 instance
- It uses the MAC address to find the corresponding network interface on the host
- It retrieves network configuration (gateway, netmask) from EC2 metadata service
- It moves the entire ENI device into the container’s network namespace
- Optionally starts DHCP client for lease renewal
This gives containers direct access to ENIs with their own IP addresses, enabling advanced networking features like security groups per container.
ECS Bridge and IPAM Plugins
ECS Bridge Plugin
Overview
The ECS Bridge plugin creates a bridge network to connect containers to the ECS Agent’s credentials endpoint. It creates a bridge device and veth pairs to enable communication between containers and the host.
Key Components
Main Flow:
- Bridge Creation: Creates or reuses a bridge device (e.g.,
ecs-br0) - Veth Pair Creation: Creates a virtual ethernet pair - one end in container namespace, one on host
- IPAM Integration: Calls the ECS IPAM plugin to allocate IP addresses
- Interface Configuration: Configures both ends of the veth pair with IP addresses and routes
Key Operations:
CreateBridge(): Creates the bridge device with specified MTUCreateVethPair(): Creates veth pair connecting container to hostAttachHostVethInterfaceToBridge(): Connects host veth to bridgeRunIPAMPluginAdd(): Calls IPAM plugin for IP allocationConfigureContainerVethInterface(): Sets up container’s network interfaceConfigureBridge(): Configures bridge with gateway IP
Configuration Parameters
bridge: Bridge name (required)ipam: IPAM configuration (required)mtu: Maximum transmission unit (optional)
ECS IPAM Plugin
Overview
The ECS IPAM (IP Address Management) plugin allocates IP addresses from a specified subnet and manages IP address assignments using a BoltDB database for persistence.
Key Components
IP Management:
- Uses BoltDB for persistent IP address tracking
- Allocates IPs from a configured subnet (e.g.,
169.254.172.0/22) - Tracks last known IP to optimize allocation
- Supports both automatic and manual IP assignment
Main Operations:
Add(): Allocates an IP address and returns network configurationDel(): Releases an IP address back to the poolGetAvailableIP(): Finds next available IP in subnetAssign(): Marks specific IP as usedRelease(): Frees an IP address
Configuration Parameters
ipv4-subnet: CIDR block for allocations (required)ipv4-address: Specific IP to assign (optional)ipv4-gateway: Gateway IP (optional, defaults to .1)ipv4-routes: Routes to add to container (optional)id: Unique identifier for IP assignment (optional)
How They Work Together
- Bridge Plugin Invocation: ECS Agent calls bridge plugin with configuration
- Bridge Setup: Plugin creates bridge device and veth pair
- IPAM Call: Bridge plugin calls IPAM plugin to get IP allocation
- IP Assignment: IPAM plugin allocates IP from subnet and stores in database
- Interface Configuration: Bridge plugin configures container interface with allocated IP
- Route Setup: Adds routes for ECS credentials endpoint communication
This enables containers to communicate with the ECS Agent’s credentials endpoint at 169.254.170.2 while maintaining network isolation.
Conclusion
Diving into ECS networking internals shows how sophisticated systems can appear simple from the outside. Network namespaces provide the isolation, CNI plugins manage the complexity, and developers get clean abstractions. Sometimes the best engineering is the kind you never have to think about.
Further resources
ECS Documentation
Networking for ECS Managed Instances
ECS Agent netlib library
This is where the code that invokes the CNIs live: netlib
CNI plugins source code
This package contains the bridge, eni and IPAM plugins, which are the “bread and butter” of network configuration. They are used by both Fargate and Managed Instances: ecs-cni-plugins
Special CNIs that are aws vpc specific. Managed Instances make use of the vpc-branch-eni plugin to configure trunk and branch ENIs. Trunking is an AWS feature that allows for more task density on hosts by giving the capability to pack more ENIs per instance.
IP Command
Source Code for iproute, the networking utility that powers the CNI plugins: iproute2
Netlink Protocol netlink
Linux Networking Resources
Official documentation networking
Free Online Books Computer Networks: A System Approach Software-Defined Networks: A Systems Approach
My favorite networking books
Understanding Linux Network Internals: Guided Tour to Networking on Linux is a bit dated but still good source of background.
I saw this book in Julia Evans bookshelf Julia is an excellent software engineer and gifted technical writer, I cannot recommend reading her blog highly enough. Networking for System Administrators
Alright, this post is getting long, I’ll stop now, but come back for the next installation where I’ll go over what I diddn’t get a chance to get into.
This deep dive into ECS networking shows the sophisticated engineering that makes container isolation possible. Network namespaces provide the foundation for secure, isolated networking while CNI plugins abstract away the complexity for developers. Understanding these internals helps appreciate the elegant solutions that power modern container orchestration.